

The 15 Best Resistance Band Exercises for Mass, Strength, and Endurance
Posted by admin on
The beauty of resistance bands is they don’t rely on gravity for resistance —like a dumbbell or pair of kettlebells — so you can perform various exercises at different angles to challenge your muscle in all different directions.
Using resistance bands for accessory exercises is a great way to add variety to your routine and give your joints a break from the constant pounding of a heavily loaded barbell. To help you sieve through all the best resistance band exercises available, we’ll dive into the benefits of training with resistance bands and provide a list of the eight best resistance band exercises.
Best Resistance Band Exercises
- Chaos Push-Up
- Bent-Over Rear Delt Flye
- Spanish Squat
- Half-Kneeling Band Row
- Band Thruster
- Band-Assisted Broad Jump
- Resistance Band Biceps Curl
- Overhead Triceps Extensions
- Band-Resisted Push-Up
- Band X Crossover Lateral Walk
- Band-Assisted Chin-Up
- Mini Band Hip Flexion Iso Hold
- Banded Passive Leg Lower
- Band Tall-Kneeling Pull-Apart
- Banded Hamstring Curl
Chaos Push-Up
Resistance bands are some of the most utilitarian tools in a gym. Not only can you lift but, but bands can be used as a training accouterment to make an exercise either easier or harder. In the case of the chaos push-up — which has you perform push-ups on the middle of a suspended band — it’s the latter. The instability of the resistance band fires up all your stabilizing muscles while performing a push-up. Anything less than perfect form, the band will give you instant feedback. (And by feedback, we mean you won’t be able to do the move. Harsh, right?)
Benefits of the Chaos Push-Up
- The instability of the chaos push-up is great for additional rotator cuff recruitment.
- Adds more core stability and control to your push-ups.
- Chaos band training activates the smaller stabilizers (shoulder, core, and hips) while improving proprioception. That is, your ability to have self-awareness while your body is in motion.
How to Do the Chaos Push-Up
Loop a heavy-duty band around each of the spotter arms of a squat rack. The higher up the band, the easier the exercise, and the lower the band, the harder the move will be. We suggest starting with the band a bit higher Place your hands on the band in a shoulder-width grip and grip tight. Bring your legs behind you, engage your glutes, and core and slowly lower yourself down into a push-up. Push yourself up and reset your good starting position, and repeat.
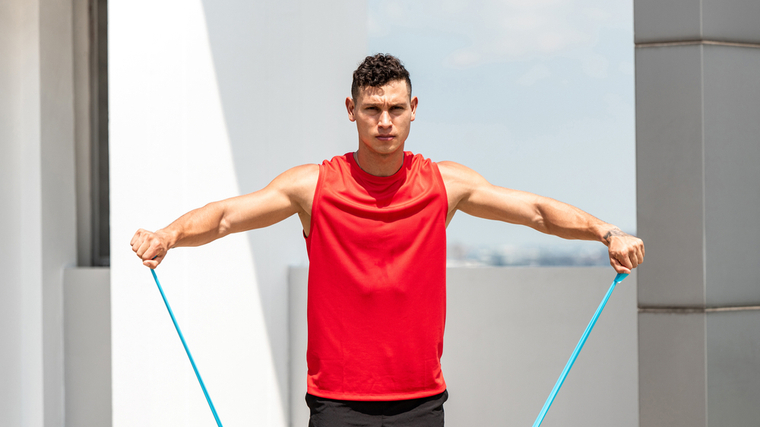
Bent-Over Rear Delt Flye
Band pull-aparts and standing reverse flyes are great exercises that work the important muscles between your shoulder blades. But bent over rear delt flyes are more optimal. Mainly because being in the hinge position makes this more of a total body exercise. In addition to working your rear shoulder, you’re also focusing on your lower back, good hinge technique, as well as the muscles of the rhomboids and traps.
Benefits of the Bent-Over Rear Delt Flye
- Trains the lower, upper back, and good hinge position.
- Great exercise for posture.
- Strengthens the rhomboids and traps in the deadlift position, which assists upper back bracing for the deadlift.
How to Do the Bent-Over Rear Delt Flye
Hinge from the hips until your torso is almost parallel to the floor and take a shoulder-width grip of the looped band. Take a deep breath and pull the band between your belly button and sternum, squeezing your shoulder blades together. Pause for a second, lower back down, and repeat.
Spanish Squat
Having a band behind your knees with the Spanish Squat allows you to sit back into the squat while keeping your shins vertical. This increases the load on the quads while taking pressure off the knees, making it a great option for people with knee pain or those looking to beef up their quads.
Benefits of the Spanish Squat
- Great squatting option for lifters with knee pain.
- Increase knee drive for your deadlift and barbell squats.
- A great option to build your quads in a functional position, unlike the leg extension machine.
How to Do the Spanish Squat
Attach a moderate looped resistance band around a squat rack at knee height. Step inside the band, putting it behind the knees, and walk back until the band is tight. You should feel the band pulling the knees forwards. Sit back into the squat, keeping your shins and torso vertical, and stand back up, pushing the back of your knees into the band.
Half-Kneeling Band Row
By lowering your center of mass, you’ll move your hips and shoulders without too much compensation from the pelvis and lower back while performing the row. This is a godsend if you suffer from lower back pain and helps dial in your rowing technique. And with the narrower base of support, you’ll receive extra core stability and glute activation benefits.
Benefits of The Half-Kneeling Row
- If hip mobility is an issue, lifting from the half-kneeling position can make the lift more accessible.
- It makes for a perfect accessory for when you’re performing squats or deadlifts because of the hip mobility benefits.
- A great option if you’re suffering from low back pain.
How to Do the Band Half-Kneeling Row
Attach the looped band around a chin-up bar or squat rack, grip t in one hand, and get into a good half-kneeling position, with knee above hip and ankle above the knee. The hand you’re rowing with is on the same side as the knee that’s down. Engage your back glute, sit up tall, and row your hand towards your hip while keeping your shoulders down and chest up. Slowly return to the starting position and repeat.
Band Thruster
Thrusters are associated with barbells and CrossFit, but you can also be performed with bands. It’s a fantastic full-body exercise that trains your legs and upper body as one unit. But the beauty of performing them with the band is, it’s easier on your joints, allows you to accumulate more volume to build more muscle, and helps improve lockout strength and power.
Benefits of the Band Thruster
- Easier on the joints of the knees, lower back, wrist, elbows, and shoulders.
- Safer movement for beginners to perform before using the barbell.
- Allows you to get more volume in for hypertrophy purposes.
How to Do the Band Thruster
Stand on the looped band underneath the middle of your feet, get into your preferred squat stance, and grip the band on either side. Bring up into the racked position and then lower down into a squat. As you’re rising from the squat, press the band overhead until lockout. Bring the band back to the racked position and repeat.
Band-Assisted Broad Jump
Broad jumps are the best expression of lower body strength and power. They are a great lower body power exercise that will help you run faster, jump higher, and improve your lockout strength for deadlifts. Performing them with the band makes it harder at the beginning to overcome the resistance and easier on the landing because the resistance on the band takes some of the impact off your knees.
Benefits of the Band Assisted Broad Jump
- A great lower body strength and power exercise that’s easier on the joints.
- Improves your acceleration and power.
- Allows you to do more reps, which means that you can accumulate more volume for muscle mass and endurance.
How to Do the Band Assisted Broad Jump
Loop a resistance band around a power rack and step into it and secure around the front of your hips. Walk forward until you feel the band pulling you backward. Hinge forward, keeping your chest up and feeling the tension in your hamstrings. Explode forward and jump, landing on the balls of your feet and slowly walk back to the starting position. Set your hips back and repeat.
Resistance Band Biceps Curl
Isolating the biceps with curls is a gym rite of passage. It’s performed with a variety of tools and is performed from a variety of body positions. Performing them with bands is easier on the joints of the wrists, elbows, and shoulders and the ascending resistance of the band makes it more difficult at the top of the movement — something other tools do not provide.
Benefits of Resistance Band Biceps Curl
- It’s a longer range of motion compared to a weight machine that limits the range of your ROM.
- Easier on the wrist, elbow, and shoulder joints.
- More resistance on the biceps throughout the range of motion.
How to Do Resistance Band Biceps Curl
Grip both sides of the band with an underhand grip and stand in the middle of the band with both your feet. Stand up straight, pull your shoulders back and down, and then curl the handles until your hands are at shoulder level. Pause, lower down slowly, and repeat.
Overhead Triceps Extension
Like biceps curls, triceps extensions are performed with various tools in a variety of body positions. With overhead triceps extensions, the band is already being stretched, providing tension from the get-go. It only gets harder as you extend the elbows, which is great for hypertrophy and improving lockout strength for your bench press.
Benefits of Overhead Triceps Extensions
- Increased tension throughout a larger range of motion.
- It helps improve overhead lockout strength, which is important for shoulder press variations.
- Easier on the wrist, elbow, and shoulder joints.
How to Do Overhead Triceps Extension
With the band underneath the middle of both feet, step forward with one foot and bring the band’s handles up behind your ears. Standing tall and keeping your elbows tucked in, extend the elbows until lockout, and pause for a second. Slowly lower down to the starting position and then repeat for reps.
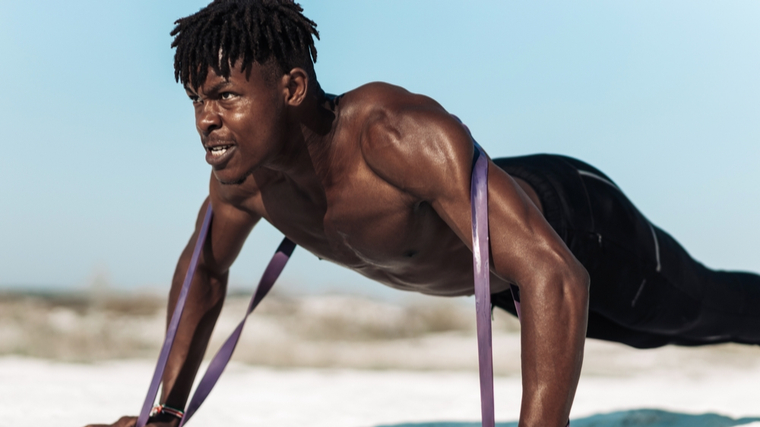
Band-Resisted Push-Up
The classic push-up will never go out of style. But that doesn’t mean you can’t make it even better. Although there are tons of bodyweight push-up variations, nothing beats adding resistance to this classic exercise.
If you want to up the ante, you can add resistance in the form of a looped resistance band. The band’s ascending resistance will make this more difficult toward the top of the push-up. This will help add strength and muscle to your chest and triceps.
Benefits of the Band-Resisted Push-Up
- The band provides extra resistance on your ascension, which will help build triceps lockout strength.
- More resistance and time under tension means more strength and muscle gains for your chest and triceps.
- Incorporating banded work into your regular push-up routine can add the variety and sense of fun your brain and muscles might need.
How to Do the Band-Resisted Push-Up
Loop the band around your upper back. Fit the ends of the band snugly under your hands. Place your hands underneath your shoulders in a plank position. Squeeze your glutes. Screw your hands into the ground. Slowly lower down until your chest is about an inch from the floor. Drive your hands through the floor. Lock out your elbows.
Band X Crossover Lateral Walk
Banded lateral walks are great at activating your glutes and getting you comfortable in different planes of motion. The X crossover lateral walk will take this up a notch.
The simple act of crossing the band over creates extra resistance to help you feel the glute burn. Plus, the X crossover lateral walk will help improve your core strength, add strength to your glutes, and strengthen the hips in the frontal plane.
Benefits of the Band X Crossover Lateral Walk
- You’ll train the gluteus minimus and gluteus medius, both of which are important for hip and knee health.
- This move works the glutes in the frontal plane, which strengthens the kinds of lateral movements you might need in sports.
- Training in the frontal (side-to-side) plane can help prevent injuries by making your body more resilient in more than one movement direction.
How to Do the Band X Crossover Lateral Walk
Stand tall. Place your feet hip-width apart. Loop one end of your resistance band underneath your feet. Pick up the other end of the loop with your hands. Form an X shape by crossing the band in front of your body. Hold the crossed band with your arms loose in front of you. Take small steps to one side. Keep your toes pointed forward the entire time. Repeat on the other side.
Band-Assisted Chin-Up
Chin-ups build great upper body pulling strength and grip strength. They can help add slabs of muscle onto your upper back and lats. But not everyone can do a full, strict chin-up. Some athletes also have joint issues that prevent them from performing multiple reps unassisted. Enter the band-assisted chin-up.
The stretched pull-up band makes it easier to pull from the bottom position. That’s because the band takes some of the load off and provides a slingshot effect to help you pull up. But as long as you still pay strict attention to form and drawing your shoulders down, you can still reap the benefits of regular chin-ups.
Benefits of the Band-Assisted Chin-Up
- This is a great option if you’re unable to perform a full chin-up so you can get your body used to the motion.
- Even if you can perform chin-ups on your own, the band-assisted version can help you add more quality reps for increased muscle and strength.
- The assistance helps to improve your overall chin-up performance, especially if you’re suffering from elbow or shoulder discomfort.
How to Do the Band-Assisted Chin-Up
Loop a band securely around the pull-up bar, as with a slip knot. Put one foot inside of the band. Take your preferred chin-up grip. Keep your shoulders down away from your ears. Activate your lats. Drive your elbows down until your chin clears the bar. Lower with control. Reset and repeat.
Mini Band Hip Flexion Iso Hold
If you have weak hip flexors, the mini band hip flexion iso hold will help fix this problem. Lifters often get confused as to whether their hips are tight or weak because they present in the same way. You may feel your hips are tight, but it could also mean your hip flexors are weak.
Weak hip flexors can lead to pain in your hips and even your lower back. This is where the mini band hip flexion iso hold can come in handy. Your hips will have to become more mobile to get into the position the exercise demands. Then, the isometric hold will make you stronger in the end range of motion — so, you can address two problems at once.
Benefits of the Mini Band Hip Flexion Iso Hold
- This exercise improves single-leg balance and unilateral hip flexor strength, which can translate into stronger squats.
- By holding onto a solid surface for added balance, increasing the time of the hold, or using a stronger or lighter band, you can easily customize this exercise to your experience level.
- You’ll improve your hip mobility and strength at the end range of motion, all at the same time.
How to do The Mini Band Hip Flexion Iso Hold
Lie on your back. Loop a mini band around the middle of both feet. Raise both knees so that your thighs are perpendicular to the ground. Slowly straighten your right leg. Point your right toes. Hold the position for time. Slowly come back to the starting position. Repeat on the other side.
To perform this standing up, the starting position will be both feet flat on the ground. Your feet should be hip-width apart. Drive your knee up to hip height. Your thigh should be parallel to the ground. Point the working foot towards the ceiling. Hold for time. Lower your leg. Repeat on the other side.
Banded Passive Leg Lower
The passive leg lower might not look like much — but there is a lot going on with this exercise. While one hip is in flexion and the hamstring is stretched, your opposite leg goes into flexion and extension. During this whole time, your core remains stable.
When one hip flexes while the other extends, it’s called hip separation. This is the basis of many forms of locomotion and most single-leg exercises. This is why this move is a great lower body warm-up drill. You’ll be activating the muscles in your hips and hamstrings independently of each other, so compensation can’t leave a weaker or less flexible muscle neglected.
Benefits of the Banded Passive Leg Lower
- This move improves hip mobility and core stability at the same time, which is an important combination when you’re preparing to squat or deadlift heavy weight.
- You’ll be performing a resisted hamstring stretch to help improve flexibility while also building strength.
- The unilateral nature of this move means that you’re training hip separation, which is important for running and single-leg exercises.
How to Do the Banded Passive Leg Lower
Lie in a supine position. Hook a resistance band around the middle of one foot. Flex both hips to 90 degrees. Keep your legs straight. Hold the band in each hand. Pull the band down enough to feel your core engaged. Keep the banded leg steady. Lower your other leg to the ground slowly. Let your heel almost touch the floor. Maintain a neutral lower back. Return your leg to starting position. Repeat for reps. Switch sides.
Band Tall-Kneeling Pull-Apart
The classic band pull-apart is a game-changer for your upper back and shoulder muscles. It promotes an upright posture and targets posterior muscles that are too often neglected in training. Upper back endurance and strength are important for good posture and for better technique with the squat and deadlift.
Getting into a tall-kneeling position while training the pull-apart maintains those benefits. It also increases the challenge to your core and hip stability. This variation is an easy way to add more pulling volume to your training without adding further stress from heavy weights.
Benefits of the Band Tall-Kneeling Pull-Apart
- This variation trains hip mobility, core stability, and upper back strength at the same time.
- The tall-kneeling position opens up your hip flexors and strengthens your glutes — it also ensures that you can’t really cheat the pull-apart by using momentum.
- You can add more pulling volume to your training without overtaxing your entire body with heavy loads.
How to Do The Band Tall-Kneeling Pull-Apart
Grab a resistance band with both hands. Assume the tall kneeling position. Plant your toes on the ground. Squeeze your glutes and quads. Raise the band to shoulder height. Keep your shoulders down away from your ears. Extend your arms in front of you with a soft bend in your elbow. Pull the band apart by squeezing your shoulder blades together. Once the band touches or approaches your upper chest, slowly return to the starting position. Reset and repeat.
Banded Hamstring Curl
You might perform hamstring curls on a machine, which is great for isolating your hamstrings for growth. But one major advantage of the banded hamstring curl is the ascending resistance of the band. The further the band stretches, the harder your hamstrings have to work. Where a regular machine or weighted variation would get easier toward the top, this move will get harder. That way, you’re training a more complete range of motion.
This helps your hamstrings grow by boosting time under tension and strength during all phases of motion. Plus, when the band isn’t stretched, it’s a little easier on your joints. The setup may be awkward, but it’s a great option if the leg curl machine is unavailable.
Benefits of the Banded Hamstring Curl
- The band provides accommodating resistance that further strengthens your hamstrings by increasing time under tension and strength across various ranges of motion.
- This variation is a great leg curl option if the machine is not available.
- If you’re looking to emphasize lower body hypertrophy with minimal equipment, this is an excellent option for you.
How to Do the Banded Hamstring Curl
Anchor a looped resistance band to a sturdy object. Lie on your stomach with your feet hip-width apart. Face away from the anchor. Put your feet on either side of the band, looping them securely around your heels. Squeeze your glutes to flatten your lower back. Pull your heels towards your glutes. Keep your hips and quads on the ground. Stop when you cannot pull any further. Slowly lower to the starting position. Repeat.
Benefits Of Resistance Bands
Although hardcore lifters frown upon the use of bands because there not the best tool for strength, they’re still lots of benefits for using bands in your program.
Versatility and Ease of Use
It’s not like dumbbells, barbells, and weight machines are hard to use, but with resistance bands, it’s easy to switch between exercises. (Also, they’re generally easier to store — making them perfect for smaller home gyms.) You don’t have to wait around for a piece of equipment to be ready, you can grab one band and do various exercises.
Muscle Recruitment
The beauty of bands is that they don’t rely on gravity for resistance to perform various exercises. The band is tight throughout the entire range of motion of almost every exercise, so they stress your muscles in ways a barbell or dumbbell can’t. You can anchor bands from anything solid to hit all your muscles from a variety of angles.
You Can Add Bands to Dumbbells and Barbells
If you already have dumbbells, weight plates, or a barbell, you can tie a looped resistance around them to add extra resistance to save you from buying more dumbbells and to keep on making progress. Also, bands add an extra level of instability to a lift and make standard barbell and dumbbell exercises more difficult throughout the full range of motion. This is why strength athletes often use them to help break through sticking points.
Improves the Strength Curve
The strength curve is the muscular force generated at each point throughout an exercise’s range of motion. Because of joint angles, the resistance is not constant. During a dumbbell bench press, more force is needed during the first third of the movement than at lockout, where the weight almost feels light.
The resistance band opposes this strength curve. When the band is not stretched, less force is required to get it moving. However, when you are locking out, more force is needed, improving your strength where you need it most, at lockout.
Easy on Your Joints
When you’re lifting barbells, dumbbells, kettlebells, they’re putting a certain amount of stress on your joints. That’s not to say that the stress from weights is bad — many lifters rely on weights to progress. But, band exercises can provide a reprieve from constant loading as needed.
Resistance Band Programming Suggestions
There are many ways to program workouts with resistance bands. Here are a handful of suggestions, depending on your training goals and experience level.
For Improved Strength
Stick to your normal strength routine, emphasizing heavy compound lifts as needed. But after your main lift, perform a banded version of that same lift for three sets of six reps.
For example, after deadlifts, reduce the load significantly, and loop a band around the barbell. Stand in the middle of the band. These are known as speed deadlifts, and they’ll help improve your pulling power while adding some extra volume via banded back off sets.
Muscle-Building Potential
When you want to add extra resistance or add extra volume without slapping on more weights, adding a band to a bodyweight exercise will do the trick. For example, add a band to a push-up for extra resistance or add a band for extra assistance with the chin-up to eke out more reps. This can minimize unnecessary stress on your muscles while giving them enough new stimulus to grow.
Circuit Training
If you want to boost your endurance while getting stronger and more mobile, try your hand at circuit training. Select three to five band exercises and perform them back-to-back. Do three to five rounds of 12 to 15 reps per move to improve cardiovascular capacity and conditioning.
- 1A. Band Thruster: 12 to 15 reps
- 1B. Half-Kneeling Band Row: 12 to 15 reps per side
- 1C. Banded Hamstring Curl: 15 reps
- 1D. Band-Resisted Push-Up: 12 to 15 reps
- 1E. Band Biceps Curl: 15 reps
- Repeat circuit three to five times, resting for 60 to 120 seconds in between circuits.
Recovery/Mobility Superset
If you’re looking to improve your recovery, try pairing a band exercise with a strength exercise that already requires solid mobility. For example, pair the tall-kneeling pull-apart or the passive leg lower with squats or deadlifts. These combinations can improve core stability and hip mobility while aiding recovery. You’ll also be reinforcing proper movement mechanics for your compound exercises, which can help you lift safer and heavier in the long term.
How to Progress Resistance Band Training
Adding more volume and using heavier bands are a couple of easy ways to progress your training with bands. For example, opt for the same amount of reps with a heavier band. Or, use the same band and add a rep or two per set. Here are a couple of addition — perhaps more creative — ways to progress your workouts with bands.
Add Tempo and Pauses
During an eccentric contraction — the lowering phase of many lifts — your muscles are stronger. That means you can tolerate more stress, which can increase your gains. You can take advantage of this by controlling the tempo of the eccentric portions of your lifts.
For example, taking three to five full seconds to lower down from a band-assisted chin up. Or, add a pause in the contracted position with a move like the banded hamstring curl. This can help you add muscular tension for increased strength and hypertrophy without adding reps or load.
Stretching the Band
This is a tricky one because any band only stretches so far before it breaks. But if you’ve taken the time to learn the limits of your band, you can take advantage of the band’s ascending resistance to make your muscles work harder to achieve lockout.
For example, try walking further away from the anchor point for the band half-kneeling row. There is plenty of middle ground between a loose band and a fully-stretched band. Traveling further from the anchor point is a great way to take full advantage of a band’s resistance.
Considerations When Training With Bands
Before you use a resistance band, check for cracks and splits. Bands can break if not properly maintained or due to wear and tear. If a breaking band has ever hit you, you know it doesn’t tickle. Avoid this issue by checking before using it.
Plus, when securing a band either around an object or around your feet, please make sure that the band will not come loose and bite you in a place where it hurts. You’ll only make this mistake once.
Furthermore, due to the ascending resistance of resistance bands, it’s difficult to measure gains and progress because it’s hard to figure out the exact poundage you’re lifting. Although different size bands give you resistance numbers, it’s not an exact science. A simple fix for this is to measure your sets with reps and then increase band difficulty slowly over time.
If your goal is health and to stay in shape, resistance bands are great, but if you’re looking to build serious muscle or strength, this is difficult to do with bands because they only come so thick and only stretch so far before they break. There are better tools than bands for building absolute strength.
More Resistance Band Training Tips
Bands are a great way to add volume to your training and strengthen your muscles from all angles without adding much joint stress. Now you know the eight best resistance band training exercises, start adding them to your routine pronto. You should also check out these other helpful band training articles for strength, power, and fitness athletes.
- 4 Barbell Exercises You Should Try Adding Bands To
- How To Use Resistance Bands To Increase Strength, Power, And 1-RMs
Featured Image: Shopping King Louie / Shutterstock
The post The 15 Best Resistance Band Exercises for Mass, Strength, and Endurance appeared first on BarBend.